Hello!

I love to dye fabric, make thread pictures and quilt. I live in the Yukon on an acreage with my husband, 2 dogs and 34 fish. It's the 'good' life.

Tuesday, January 29, 2013

Wedding Quilt

Mookie's daughter #3 is getting married in September, the first one I might add out of 4 daughters, and I want to make them a modern but complicated quilt.
I have soooo MANY quilts on my Pinterest site, (with a lot of followers-thank you very much) but I cannot decide on any one quilt.

This is my favorite modern quilt by Ian Hundley (no web site?!), but I think it is too abstract for this (or any) couple.


And I really like this one too, but I have already made a similar one here:


So maybe something like this from The Quilting Edge:

Chinese Coins like THIS one?


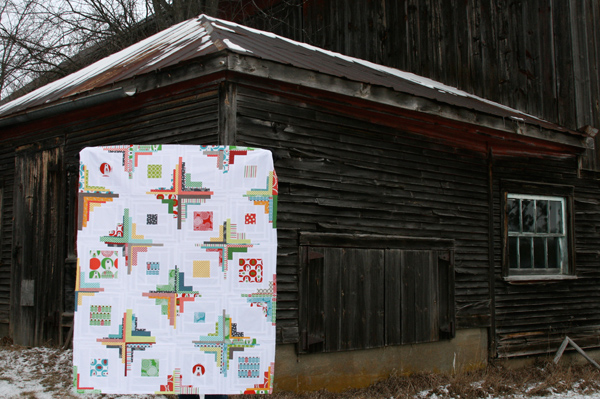
Or THIS one--Too White? Too girlie?

I like THIS one too:

And by E. Hartman as well, I like this variation:


Or maybe I should do a scrappy/paper pieced like the New York Beauty like this one HERE?
New York Beauty Quilt
Not very modern, but I like PP.

Still lots of time to decide. What do you all think? What is your choice?? If you want, see what I like on my Pinterest site and tell me which one you like the best. All help appreciated! 


Tuesday, January 22, 2013

Why does my piece pucker??

I was recently asked how to keep a thread piece from puckering so badly when you work it, so I thought I would share the answer here.
There are a few things you can do:
1. Use a hoop. This will keep your work tight and reduce the chance of puckering. Its not the best way, but it works to some extent.
2. My way. I always use 2 things—stabilizer and fusible web.  Here’s how..
fusible
I use Pellon Wonder Under in most of my projects. I buy it by the roll and I have 5 rolls ready to go for this year. And I will use it all up. Really! Above you can see I chose an image in a piece of cotton and printed it out. I don’t know if you can see, but the fabric is cut ON THE BIAS. This also helps keep the puckering and waves to a minimum.

Then I peel the back of the Wonder Under off, and iron on a piece of stabilizer, like the one below. Iron the stabilizer to the Wonder Under, not the front of your piece. (seriously, people have done this in my class).
stabilizer I don’t know if this helps, but this is not a really thin, nor a heavy duty stabilizer—its medium? I buy it on a roll and I'm sorry, I don’t know who makes it. It tears easily and adds just the right amount of stability. Iron this on and then trim it all so no stabilizer or fusible web is dangling over the piece of fabric.

And THAT is how you make a piece that will hardly pucker or buckle or warp or flock or anything when you do intensive machine stitching on it. 
fusible

Sunday, January 20, 2013

Bird Embroidery Quilt


I have been making the Redwork Winter Twitterings  quilt "my way". That is, I do not do hand embroidery, so I did these pieces by machine. I used a 12 weight thread and I think it turned out nicely.

Here are all the pieces on the wall. This is pretty close to the actual blue I used.
Untouched

Colour corrected

As can be seen, I decided to do this in blue instead of red as my house is more blue and silver at Christmas.

I actually think this was the easy part. Now onto making the pieced blocks!

Wednesday, January 9, 2013

A Good Book

This Christmas I gave 4 of my good friends this book- "All I Did Was Listen" by Rachel Awes. I won't say it was earth shattering or changed my life in any way, but it is a wonderful book. I am not getting paid by Ms Awes to promote her book, nor do I have a give away. I just wanted to share something that I really enjoyed.

Here is the introduction (from Rachel's blog):


And another couple of sharings with her funky artwork:


======================================


Anyways, not much of a post, but I wanted to share this wonderful book with you all. Now back to work for me!

Saturday, January 5, 2013

Cardinal

Now that my LQS has the classes posted for the spring, I can show you the cardinal art quilt I will be teaching.

I have a thing about birds, especially cardinals. This is ironic given that I don’t think I have ever seen a cardinal in real life, but that does not stop me from liking them.

This year, I decided to offer 3 classes that go from choosing a subject, to painting, to embellishing,  and to quilting the piece. I chose the cardinal as my subject.

Without further ado, here is the completed piece! This terrific photo is by Travis Lowe. His photography is wonderful and his bird photos are my favourites.


Thread trees made using a zigzag stitch. Tension is set at 9 on my Bernina and the bobbin tension is very, very loose. This pulls the dark brown to the surface.

White puffy paint with sparkly embossing powder added makes the snow.
Hand dyed ice blue background pulled from my stash.
The cardinal itself is all thread. Beak left untouched after painting it except for a faint pale grey to delineate the upper and lower beak.

       You can click on any ofthe pics to see a larger image.


cardinal fat
I love this guys fat belly. 
cardinal face     


Last night (or this morning) at 3am I was done all 4 class samples, had printed out the the supply list handouts, and design boards done. I set my alarm for 8am in case I slept in (I wish) and was at the store by 8:30.

And this morning I even made 3 pots of soup! I pot of ham and split pea and 2 pots of chicken broth. DSCN3545

Then I loafed around and watched all of season 4 of Merlin. And ate soup. Sigh…. It was good to be me today.  haha.

Wednesday, January 2, 2013

Welcome 2013

 2012 was a great year for me. I am essentially a loner kind of gal but I pushed myself out of my comfort zone and made 2 new friends. I also connected online with a like minded thread painter and have been exploring this new friendship as well. My husband and I have been making serious lifestyle decisions and our joint New Years resolution is to get active and fit.
Today I downloaded the Quilting Art In Stiches  Vol. 9 and something Eileen Lauterborn noted there resonated with me. She wrote: “The more artistic decisions you make by yourself, the stronger your ability as an artist will become.” 

What good timing this observation is! I am working on my lesson plans for this spring, and as always, I struggle with them. I try to keep up with trends and try all new techniques that I encounter. I then share my insights with like minded folks who attend my classes. I do this only because there is no organization or guild in my community that shares my interest in alternative art quilts and mixed media. What a surprise it is when I teach these classes and am told that they would not have thought to do a specific technique the way I do it or that they cannot ‘think’ their way out of a specific problem.  I am going to gently push them to make their own decisions and remember Eileen Lauterborn's quote. Heck, I may even make this my new mantra for classes..

This year I am teaching a 3 part class—creating a scene with paint, then thread, then embellishments. My final class is a stand alone advanced thread painting. No newbies, so those advanced quilters will be able to work on their skills.

Here is a teaser of the 3 part class. “-)   It is a large piece and is taking a fair amount of time. But its coming along.. And I have had to make a lot of decisions, so I guess I am on the road to becoming an artist. hehe
cardinal

This weekend I’ll show you the completed piece!